Bigger! Faster! Stronger! 3 GB in the 2.0 Ghz Macbook

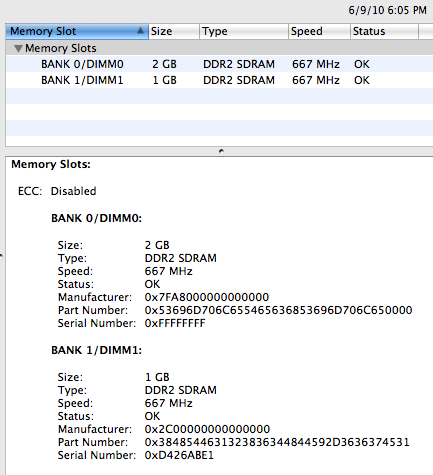
The official Apple specs say that the 2.0Ghz Macbook can take up to 2 GB of memory. There’s a bit of information on the web–like this forum posting, for example–that says you can go up to 3 GB. The system board can address slightly more than 3 GB, so the 2 GB limit is reportedly lower than what the hardware is capable of. By chance, I noticed a 2 GB chip for a reasonable $40 on my local craigslist, so I decided to see for myself whether the stories were true.

It seems they are! I’ve been running the computer for a little over a week now with two chips: a 1 GB module, which had been in there before, and the new 2 GB module. It’s been put through its paces: on a given work day, I run Eclipse, Firefox, Thunderbird, Colloquy (an irc client), Adium (instant messaging client), Skype (a VoIP client), a java application server in development mode, a mysql server, and emacs, all at once.

The swap size has still been high, typically around ~500 MB, but there are no longer the delays that I used to experience with 2 GB of memory when I had a lot of apps open and switched between them. So far, there have been no problems with stability.

Here’s a screenshot from System Profiler:

Note that Apple released two different models with the 2.0 Ghz Core 2 Duo processor. You can find your machine’s model in System Profiler on the Hardware Overview screen. The 2 GB official limit applies to “Macbook2,1.” The later version, “Macbook3,1” can take up to 4 GB.

With the additional memory, this machine will hopefully last me another two years.

Upgrading a Hard Drive on a Macbook

A little over a week ago, I ran out of space on my 80 GB hard drive. I didn’t think that would ever be possible. For the first time, “df -h” showed available space in kilobytes!

In an ideal world, I’d replace the drive, put a fresh installation of OS X on it, install all my applications anew, and move my data over from the old drive. But since this is incredibly time-consuming, I decided simply to clone everything from my existing drive to a new one. I’d never done this on a Mac before. All seems to have gone well with my upgrade, so I’m posting some notes on my process. Standard caveat: while they worked for me, they may not work for you!

After some hunting and price comparing, I bought a 250GB Seagate Momentus (ST9250315AS) drive at Office Depot and a generic USB disk enclosure at RE-PC. I would have preferred FireWire, but they seem difficult to find in brick-and-mortar stores and they’re more expensive.

Third-party applications exist to clone entire drives, but it turns out Disk Utility works just fine for this. After connecting the drive to the Macbook via USB, it should show up in the application’s drive list in the left pane. There are three steps to prepping the disk (adapted from this site by one “A Brody”):

1) In Disk Utility, select the drive and click the “Partitions” tab. Select “1 Partition” for the Volume Scheme. Select “Mac OS Extended (Journaled)” for the format. On Intel-based Macbooks, the drive should have a GUID partition map scheme, so click “Options…” for a dialog and make the appropriate selection. Click “Apply” to perform the partition.

2) Click the “Erase” tab and erase the disk.

3) Open a Finder window, ctrl-click on the newly created volume, and select “Get Info.” At the very bottom of the window, there is a checkbox pertaining to ignoring ownership and permissions. Change it so the computer DOESN’T ignore these!

Now the drive is ready for data. This part is a bit counter-intuitive: in Disk Utility, select the “Restore” tab. Drag the old volume from the list into the “Source” field. Drag the newly created empty volume from the list into “Destination.” Click the “Restore” button to start the copy. Copying 73G (the actual size of the drive was smaller than the nominal size) took a little over 2 hours.

After the copying is finished, shut down the computer, and swap out the drive by following Apple’s instructions. I needed to use a Torx T8 size driver for the screws attaching the drive to its mount. Be aware that Macbooks and Macbook Pros might use different size screws.

And that’s it! The machine should boot off the new drive.

Installing DBI on Leopard’s perl 5.8.8

I needed to get my perl installation updated to do some development locally. As usual, perl was a pain in the ass. Long story short: Install Xcode 3.0, copy the “reentr.inc” file from the 5.8.8 source distribution, and DBI should install.

Below is the long-winded log of my woes, offered in the hopes it might help someone.

First, DBI 1.604 wouldn’t install via cpan, so I tried installing it by hand. But I just got the same error when running “make”:

No rule to make target `/System/Library/Perl/5.8.8/darwin-thread-multi-2level/CORE/config.h', needed by `Makefile'.

I found this blog post, “Leopard Perl 5.8.8 installation throws errors when compiling (makefile)” mentioning the exact message, which recommended copying the CORE directory from 5.8.6 instead the above location. I tried that, but then I got this error instead:

DBI.xs: In function ‘dbi_profile’:
DBI.xs:2398: warning: implicit declaration of function ‘GvSVn’
DBI.xs:2398: error: invalid lvalue in assignment
DBI.xs: In function ‘dbi_profile’:
DBI.xs:2398: warning: implicit declaration of function ‘GvSVn’
DBI.xs:2398: error: invalid lvalue in assignment
DBI.xs: In function ‘XS_DBI_dispatch’:
DBI.xs:2970: warning: assignment makes pointer from integer without a cast
DBI.xs:2972: error: invalid lvalue in assignment
DBI.xs:2985: error: invalid type argument of ‘->’
DBI.xs:2989: error: invalid lvalue in assignment
DBI.xs:3293: warning: unused variable ‘Perl___notused’
DBI.xs: In function ‘XS_DBI_dispatch’:
DBI.xs:2970: warning: assignment makes pointer from integer without a cast
DBI.xs:2972: error: invalid lvalue in assignment
DBI.xs:2985: error: invalid type argument of ‘->’
DBI.xs:2989: error: invalid lvalue in assignment

Googling these error messages turned up surprisingly little. On another blog with a post titled, “Mac OS 10.5: Leopard” that mentioned difficulties with DBI, commenters suggested various solutions, but none of them worked for me. The blog author got an older version of DBI to install but I couldn’t get that to work either.

I discovered that Xcode 3.0 (developer tools for Leopard) contains the 5.8.8 files that belong in that CORE directory. This seemed like a better option than copying the probably outdated 5.8.6 files. You can get the gigantic Xcode disk image, a whopping 1.1 gigabytes, from the Apple Developer Connection site. Registration is required through the “Member” link, and once you’re in, go to Downloads and search for Xcode.

Before installing Xcode, I cleared out the hosed CORE directory I’d been mucking with. “DeveloperTools.pkg” is what contains the perl headers, so you can probably get away with just installing that (double-click it), instead of the entire XcodeTools.pkg. It did the trick: the compiler was now finding the “GvSVn” symbol it couldn’t before. But now I got this message during make:

In file included from DBIXS.h:19,
from Perl.xs:6:
/System/Library/Perl/5.8.8/darwin-thread-multi-2level/CORE/perl.h:3993:22: error: reentr.inc: No such file or directory
In file included from DBIXS.h:19,
from Perl.xs:6:
/System/Library/Perl/5.8.8/darwin-thread-multi-2level/CORE/perl.h:3993:22: error: reentr.inc: No such file or directory
lipo: can't open input file: /var/tmp//ccQ8vbDU.out (No such file or directory)
make: *** [Perl.o] Error 1

In desperation, I downloaded the perl 5.8.8 source distribution tarball, and simply copied reentr.inc into the CORE directory. Voila! Make went to completion and I could install the module. From there, I went back into cpan to install DBD::mysql without any problems (you need mysql installed in the default location, /usr/local/mysql, of course).
Eclipse and JDK 1.6.0_05 on Mac OS

Last week, Java 1.6 went out of Developer Preview and became an “official” release for Mac OS 10.5.2. (You still can’t get 1.6 for 10.5.1, sadly.) I’ve been fiddling with 1.6 and Eclipse, trying to get them to play well together, and here’s what I’ve found so far.

Eclipse itself needs to run on 1.5. There’s a great blog post, “Running Eclipse on MacBooks with Java 6”, written by one “rkischuk,” that explains why: 1.6 doesn’t support 32-bit SWT-Cocoa bindings, so Eclipse will bomb. The error I got was a mysterious “JVM Terminated. Exit code=-1” and a list of run-time options. If you run Eclipse from a shell, you might see this:

2008-05-09 10:53:55.443 eclipse[257:10b] Cannot find executable for CFBundle 0x116030 (not loaded)

or maybe this:

_NSJVMLoadLibrary: NSAddLibrary failed for /System/Library/Frameworks/JavaVM.framework/Versions/CurrentJDK/Libraries/libjvm.dylib
JavaVM FATAL: Failed to load the jvm library.

When I installed 1.6, I had messed around with /System/Library/Frameworks/JavaVM.framework/Versions, trying to get 1.6 to run as the system default. But the cleanest solution for me was to KEEP 1.5 as the default. So make sure that directory looks like this:

drwxr-xr-x 11 root wheel 374 May 9 10:49 ..
lrwxr-xr-x 1 root wheel 5 May 5 22:41 1.3 -> 1.3.1
drwxr-xr-x 3 root wheel 102 Nov 2 2007 1.3.1
lrwxr-xr-x 1 root wheel 5 Apr 18 13:07 1.4 -> 1.4.2
lrwxr-xr-x 1 root wheel 3 May 5 22:41 1.4.1 -> 1.4
drwxr-xr-x 8 root wheel 272 Apr 27 2007 1.4.2
lrwxr-xr-x 1 root wheel 5 Apr 18 13:07 1.5 -> 1.5.0
drwxr-xr-x 8 root wheel 272 Apr 27 2007 1.5.0
lrwxr-xr-x 1 root wheel 5 May 5 22:41 1.6 -> 1.6.0
drwxr-xr-x 8 root wheel 272 Apr 18 14:03 1.6.0
drwxr-xr-x 9 root wheel 306 May 9 10:50 A
lrwxr-xr-x 1 root wheel 1 May 9 11:13 Current -> A
lrwxr-xr-x 1 root wheel 3 May 9 11:12 CurrentJDK -> 1.5

Eclipse should run as it normally does.

If your code project(s) don’t require SWT, you can use 1.6 as an Installed JRE within Eclipse. Go to Preferences -> Java -> Installed JREs -> Add…. Select “Mac OS VM” and point it to:

/System/Library/Frameworks/JavaVM.framework/Versions/1.6.0/Home

Building projects and running JBoss using the 1.6 seems to work just fine.