The Virtues of Simplicity

In this age of bloated software, it’s hard to find solutions that do what you need without a ton of unnecessary complexity. Software that’s more complex than the problem at hand makes it costly to learn, maintain, and troubleshoot. For companies and individuals with limited resources, that’s a real challenge. Glenn (my current client) and I wanted a solution to replace some slow performing CGIs but mod_perl was too much. Plus the idea of embedding a perl interpreter in Apache seemed scary.

I looked for perl web application server options that could be proxied through Apache. That architecture would give us the performance benefits of code preloaded into memory, persistent database connections, and precompiled templates. The only thing I found was OpenInteract, but its module list is quite large, and the project hasn’t been updated in a while. I didn’t want to have to dig around a ton of foreign code if I needed to squash a bug. So I decided to write my own.

The result is a neat little thing I call “perlserver,” a heavily modified version of this piece of public domain code for a preforking HTTP server. I deliberately kept it simple but gave it all the needed features: URL-to-handler mapping, safeguards against memory leaks, maximum configurability. It’s only 450 lines of code and is tightly integrated with the LWP modules. To convert the existing set of perl CGIs, the code was simply wrapped in packages that conform to a simple API understood by perlserver. Existing URLs were proxied to perlserver by clever RewriteRules in Apache.

Before, a CGI that built a complex page typically took 900 – 1500ms. Now, the same page served from perlserver by proxy takes around 300 – 400ms.

I’m thinking about releasing the code as open source. It’s not fancy, but that’s why it’s great: it’s a good option for sites that want better perl performance without the tedious complexity of other existing solutions.

Decorators, CherryPy Tools, and Other Python Adventures

In my free time I’ve been working on my own interesting side project using CherryPy. This is my first major foray into Python: I’ve admired it for a long time, but haven’t used it much except for the occasional small script. So it’s pretty awesome to be really digging in. And I’m finding the more I learn about Python, the more I love it.

CherryPy, like Python, is extremely easy to start developing with, but it also has a ton of mind-blowing stuff available when you’re ready to do more. One of these more advanced features is what they call “Tools,” which (among other things!) let you write callbacks into various points of the HTTP request-response cycle. The documentation explains tools in detail, but a good practical example is here. I’ll condense it to relevant bits:

def noBodyProcess():
    """Sets cherrypy.request.process_request_body = False, giving
    us direct control of the file upload destination. By default
    cherrypy loads it to memory, we are directing it to disk."""
    cherrypy.request.process_request_body = False

cherrypy.tools.noBodyProcess = cherrypy.Tool('before_request_body', noBodyProcess)

class fileUpload:
    """fileUpload cherrypy application"""

    """ [bunch of code cut out] """    

    @cherrypy.expose
    @cherrypy.tools.noBodyProcess()
    def upload(self, theFile=None):
        """upload action
        """ [more code ... ] """

The example shows how to set cherrypy.request.process_request_body to False, at the “before_request_body” hook; this overrides the default behavior, allowing you to deal directly with the request body contents.

The nice thing is you don’t need to understand a whole lot about the Tools architecture to make them work, although some things puzzled me initially (more below). Since I really wanted to know why and how the above did what it did, I spent some time poking around. Some things I discovered:

1) Decorators (the lines with the @ symbol) are executed when the class definition is executed. It’s a bit of shortcut syntax for modifying method definitions. I was confused about this for a while, thinking that decorators are just simple wrappers, called each time the function is. Nope!

2) The Tool decorator above modifies an attribute called “_cp_config” of the index() callable. (Not only do objects have attributes, but functions do too in Python–in fact, functions are actually objects! Wacky.) This is how CherryPy stores info about the Tools that should apply to specific handlers.

3) When Request.run() executes, it looks at the relevant Tools, and calls into them as appropriate. In this example, the specific Tool created says noBodyProcess() should be executed at the “process_request_body” point in the request cycle. So it does.

4) cherrypy.request is a strange thing. I was wondering why it’s accessed everywhere directly, as opposed to being passed as request instances into the handler (as it is, say, in Java Servlets). Doesn’t that mean every thread is handling the same request?! Nope. Turns out cherrypy.request is able to store per-thread data, even though the name is accessed globally. (See the threading.local class.)

The convenience in CherryPy comes at the cost of some transparency and intuitiveness: not a high cost, mind you, but a cost nevertheless. Don’t get me wrong, I think CherryPy is pretty excellent. Still… it really tripped me up that Request.run() examines the handler’s attributes for Tool callbacks, instead of storing that information separately (there may well be good reasons for doing it the way it’s done). The fact that cherrypy.request is thread-local also prompted a “Huh?!?!” at first.

Bad user interface! Bad! Bad!

Changing options under the System Preferences panel for Mac OS typically takes effect immediately. Unlike Windows, there are no standard “OK” and “Cancel” buttons. That’s cool… it’s simpler and more intuitive that when you change something, well, it should just change.

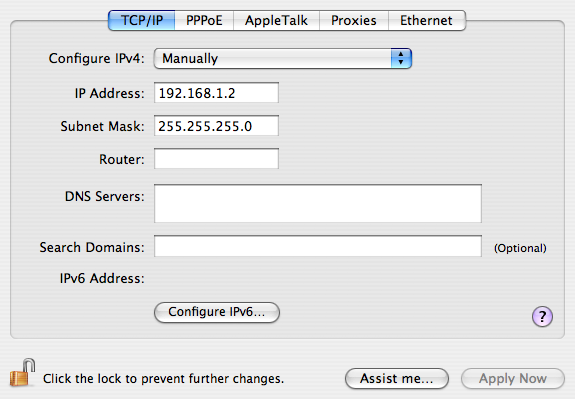
Except when there’s a complicated panel that actually does have an “OK”-type button. Like Network settings, for example. If I have a static IP address, the window looks like this:

network_scr1.png

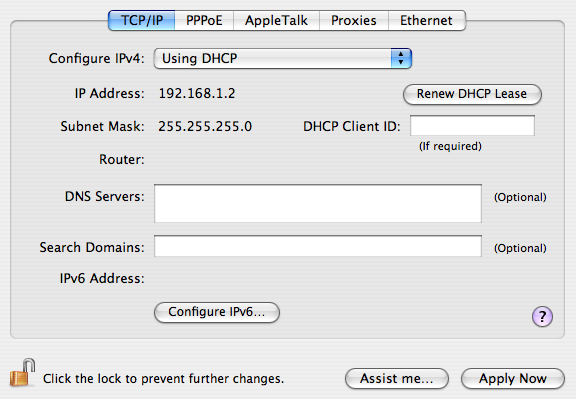
Now, when I pull down the “Configure IPv4” selector and change it to “Using DHCP,” the panel immediately changes to look like this:

network_scr2.png

At this point, I always click “Renew DHCP Lease” to get a new address. I mean, it’s right there–so close to what I just changed.

But it doesn’t work. It grays out for two seconds, then becomes active again. The old address remains, unchanged. I’m fooled into thinking something is wrong with my network cable, or the network configuration is amiss elsewhere. I troubleshoot, and click and click, like an idiot…. until I realize I have to hit “Apply Now” at the bottom, before DHCP even takes effect.

Now, I’ll be the first to confess I’m no UI genius. I can make basic, clean-looking interfaces, but I make sure to get help when I need a solid UI for a complex workflow. But even with my impoverished sensibilities, I can spot the simple fix here that would save a great deal of anguish and wasted time for potentially frustrated Mac users everywhere. Don’t show a damned button unless it does something. Or at least gray it out until it’s ready to be clicked.

Sheesh.

The Joy of Documentation

I almost always have reference documentation open on my desktop: browser windows with API docs, man pages in terminal windows, Acrobat files. It’s too hard to remember every detail about infrequently used calls and more obscure language syntax; I’ve got better things to do with my brain. It’s strange, I’ve always preferred learning by examples + reference docs, rather than by hand-holding tutorials or “how to” books. I like the anal-retentiveness of official standards. =)

AJAX certainly requires familiarity with a lot of different specs. It was difficult initially to know where to look for something, so hopefully this list will help someone out there who learns the same way I do.

Document Object Model (DOM) Level 2 Core – This spec gives you info about the fundamentals of the DOM. This is the “base” upon which the HTML DOM is built, so it’s very useful for figuring out how to traverse the document hierarchy and manipulate it in basic ways.

Document Object Model (DOM) Level 2 HTML – This spec describes the HTML-specific DOM. This is the “meat” of building any highly dynamic, interactive application, since you’ll certainly need to know how to manipulate HTML elements.

Cascading Style Sheets Level 2 Revision 1 (CSS 2.1) – I look here not just for info about stylesheets, but for an understanding of the model for how document elements are (supposed to be) laid out. Go here when something looks misaligned or off-kilter, or when trying to programmatically control aspects of visual layout.

Core JavaScript 1.5 Reference – This reference on the Mozilla site is comprehensive and easier to read and navigate than the ECMA docs in PDF format.

XMLHttpRequest Object – Without this object, it ain’t AJAX. This baby is how the browser performs asynchronous data requests and conveniently makes available XML responses as Document objects. Neato!

Prototype.js API – This is a pretty amazing library that extends the DOM, providing all sorts of extras for working with document elements and ensuring cross-browser compatibility. It’s not a library for fancy effects or pre-built interface widgets; rather, it makes up for the convenience deficiencies in some of the DOM specs.

Boy, that’s a lot of docs. Right now, I’m still looking for good info on support and compatibility for various versions of DOM and CSS in various browsers.